Welcome to the Made by Hand Vendor Manual. Here you will find guides and FAQs to help you set up your Made by Hand shop!
Use the navigation on the left to pick a topic, then navigate to the appropriate section to find the information you need.
If you need further help, please get in touch with support at support@madebyhand.market
FAQ
What Is Made by Hand?
Made by Hand is a curated marketplace for handmade goods and artisan work. We aim to be another outlet for artists and makers to sell their wares in the dense world of online commerce.
We are a supplement to your main shop, providing curated collections promoted to potential customers. Whether you sell on your on website, Etsy, or in a brick and mortar shop, Made by Hand is just another tool for getting your products out to as many people as possible.
You can learn more about our company and mission here!
What Can I Sell on Made by Hand?
Artists and makers on Made by Hand can sell anything handmade or originally designed. Some examples of popular products include handmade clothing, jewelry, bath and body products, candles, artwork originals and prints, home decor, and much more.
Some products have specific restrictions and guidelines in order to uphold our mission of creating a beautifully curated place for authentically handmade products.
Reselling is not allowed. Think of Made by Hand as a craft market. In order to sell here, you must be the creator of the goods you are selling. If you design something and have it printed on products to sell, that is perfectly fine! As long as the design is your own intellectual property.
If you're ever unsure about whether or not your product can be sold in our marketplace, just reach out!
Do I Need to Pay to List My Products?
There is no listing fee for selling products on Made by Hand. We work on a flat commission rate for every vendor of 10% from each sale. This means you can list as many products as you want and keep them listed as long as you want without any upfront investment.
This model is meant to provide this curated space to vendors at any stage of their creative business without overhead fees. We want to help you gain exposure and reach more customers without having to worry about investing before you make a sale.
Our commission portion helps keep Made by Hand running and also allows us to promote and advertise the marketplace on behalf of our vendors.
Shop Setup
Getting Started
In order to sell on Made by Hand, you will have to register an account and set up your shop.
You will first register yourself as a shop owner, then navigate to your dashboard to input your shop information.
Since Made by Hand is a curated shop, you will not be able to add products for sale right away. Your shop will be reviewed to make sure it fits our community guidelines and specifications, then you will receive an email letting you know if you are approved or denied.
Check out the Vendor Registration page to get started.
The Vendor Dashboard
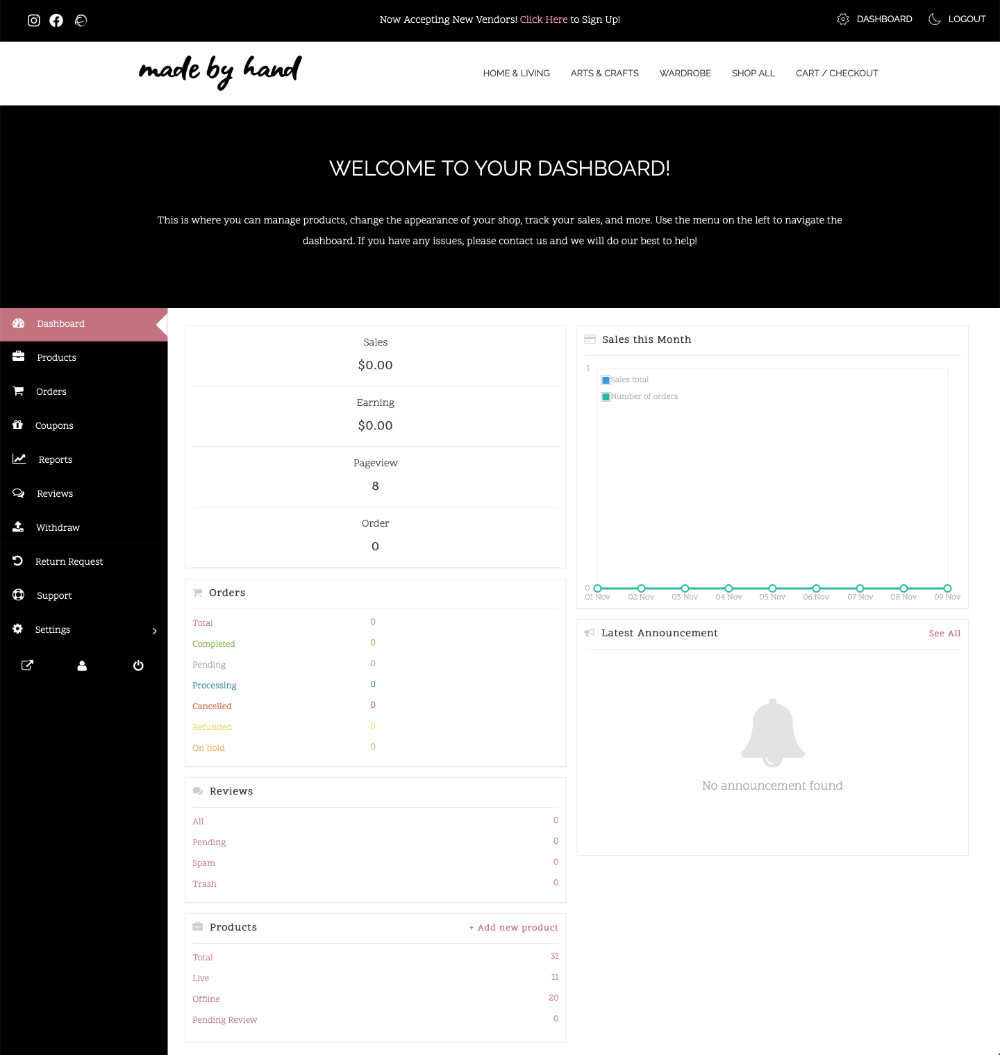
Once your vendor account is created, you will be able to access your Vendor Dashboard.
The main page will show you a quick overview of your shop and sales.
Your Dashboard allows you to fully manage your shop and product listings. The Dashboard has a sidebar navigation that allows you to access various tools and settings for your account.

Shop Customization
Before you start adding products and selling, you will need to fill out your shop profile and customize it to fit your brand.
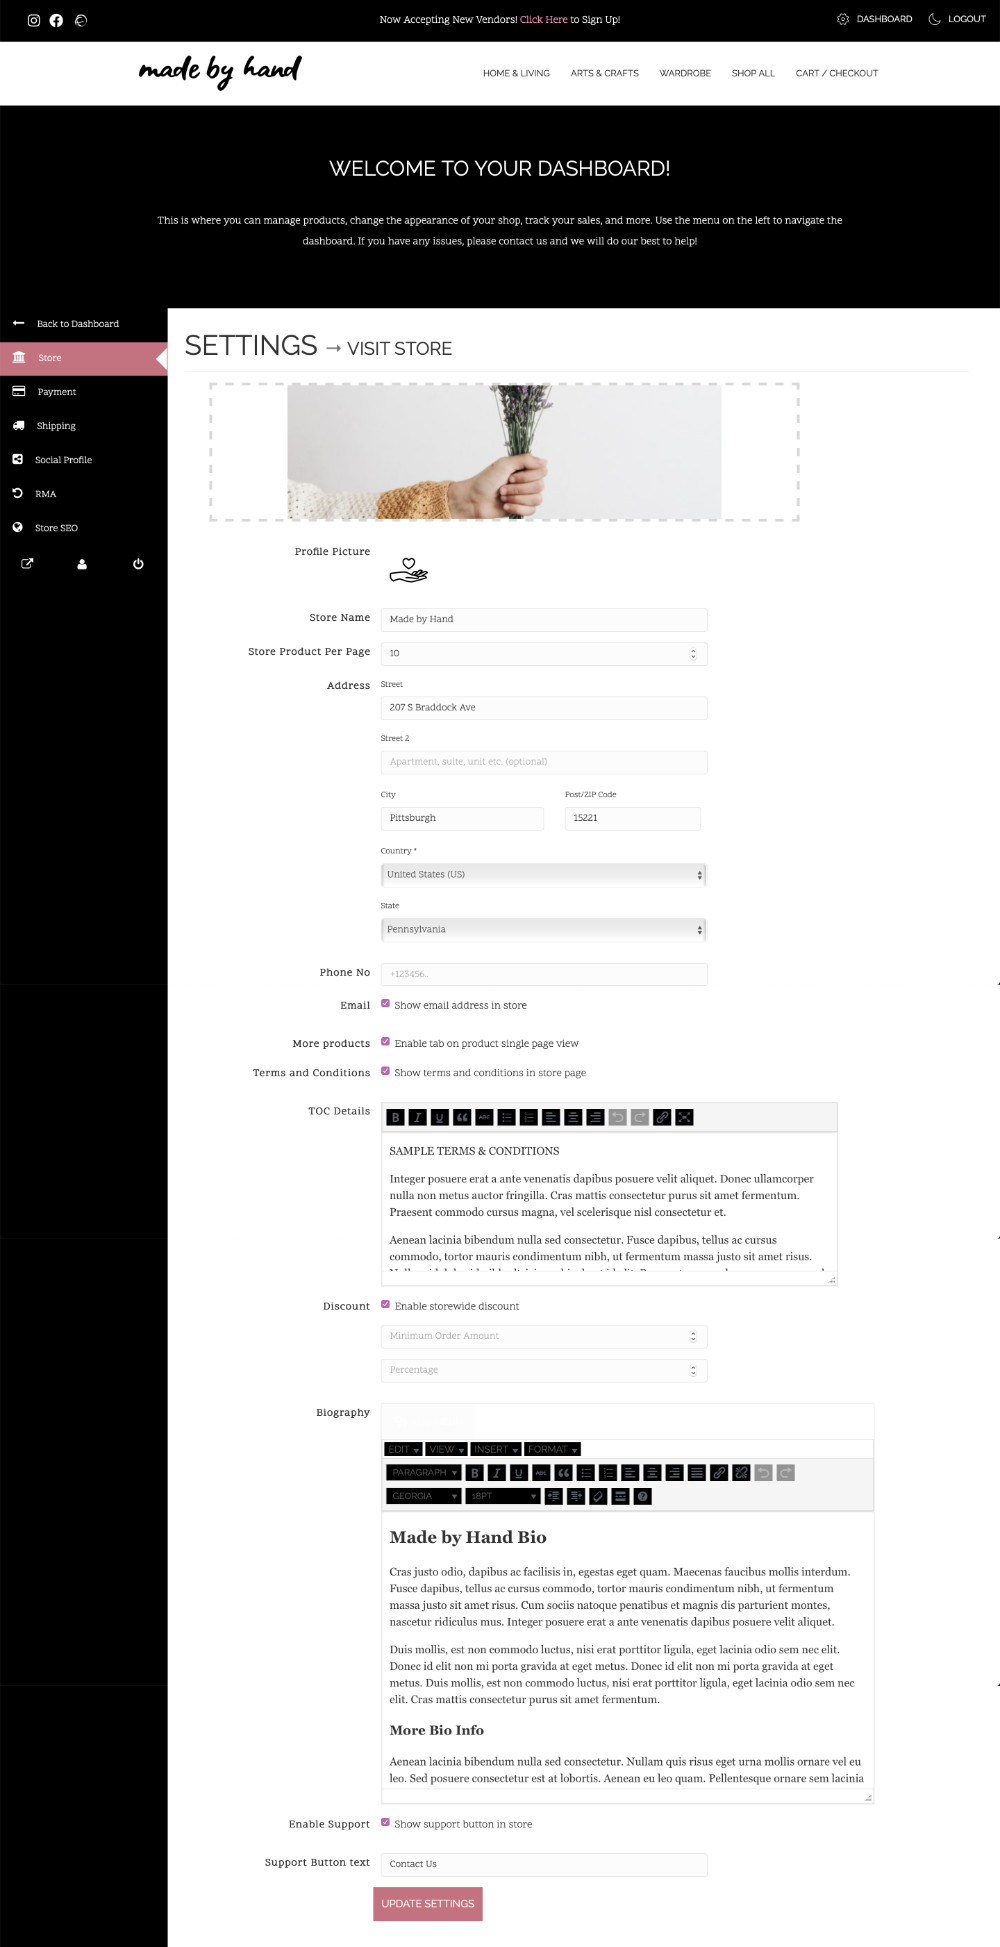
On your Dashboard, use the side menu to navigate to Settings > Store
On this view you will be able to add a shop banner, a shop avatar, and enter other important information about your store.

Terms & Conditions
You can add your own shop's terms and conditions to your shop using this section.
Store Hours
Use this section to add store hours if you have a physical location that you sell at as well.
Discount
If you want to hold a storewide sale, you can use this setting to create the criteria for the sale. Add a minimum order amount, then choose the percentage discount this will provide once that amount is met.
(You can also apply product specific discounts on the individual products or add coupon codes.)
Biography
This area can be used to put together a shop bio for your store. Use it to tell your customers about who is behind your shop, why you do what you do, and what makes you unique!
Support
Enable a support button to allow customers to send you personal messages to help with their order or ask questions.
Shipping Settings
After your shop is customized, you will need to setup your shipping information in order for your customers to be able to complete a purchase from your store.
Basic vs. Zoned Shipping
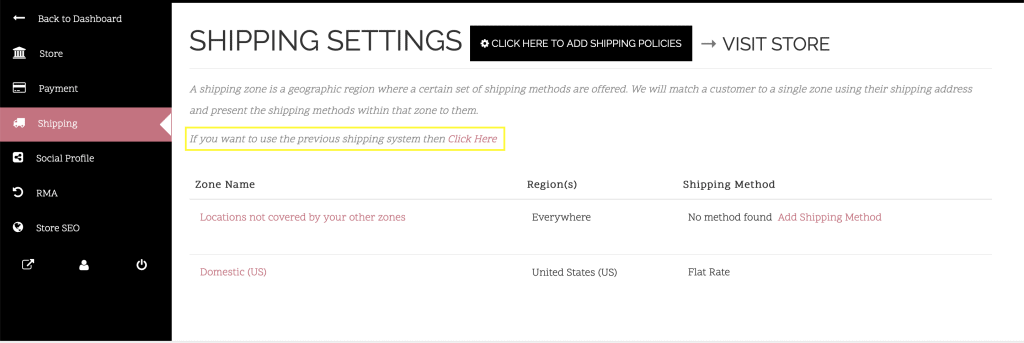
By default, your shop will be set to Zoned Shipping mode. You will be able to setup shipping options for various geographic zones from the list. If you don't ship to a certain zone, don't add any shipping methods for that zone.
If you want a more broken down shipping process, you can click the link on the Shipping Settings page to use the Basic Shipping settings:

Shipping Policies
If you're using Zoned Shipping, click the button at the top next to the "Shipping Settings" title to access the Shipping Policy editor. Use the form to enter your shipping policies.
If you're using Basic Shipping, you will be able to edit your shipping policies on the main shipping settings page.
Shipping Methods
If you are using Zoned Shipping, you can add shipping methods to specific zones. Using methods, you can offer options like flat rate shipping, local pickup, and free shipping to specific places.
Shipping Zones
Shipping Zones can be as specific as zip codes, or as broad as countries. Make sure you setup any zones that you will ship to with their specific methods.
Coupons
You can setup your own coupon codes from this view to offer promotions to your customers.
Create coupons based on percentage discounts, fixed price, or make it product specific. You can change the parameters that determine how the coupon can be used. Exclude sale items from discounts, set an expiration date, or set a usage limit.
Returns & Refunds
You will need to create your own return and refund policies. Made by Hand is not responsible for any product, shipping, or delivery issues. These must be handled between you and your customer.
Make sure you cover all of the cases in which you do and do not accept returns or refunds, and tell your customers how to complete these requests with you.
Withdraw Settings
In order to get your commission payment from sales on Made by Hand, you will need to set your Withdraw Settings. Navigate to your Dashboard > Settings > Payment
We preform vendor payouts through Stripe.com for security and ease. You will need to create a Stripe Merchant account before you can start receiving payouts from your sales on Made by Hand.
Click the "Connect with Stripe" button on your Payment dashboard and follow the steps on the page to set up your Merchant account and start getting payments.
Orders
Use this view to look at all of your shop's orders. You can manage orders here, filter through past orders, and export order details.
Reports
The Reports view allows you to see an overview of your sales and profits.
Use this to get an idea of how your shop is doing, keep track of coupon usage, and more.
Reviews
Customers will be able to rate and review your products in your shop. You can see the reviews left by verified customers and choose to display them on your products or not.
Sometimes spam can get through and you will need to remove those spam reviews.
Support Tickets
If you've enabled support on your shop, your customers will be able to submit support tickets to you for help. Here you can view the tickets and address them in order.
This system prevents missed emails and messages going to email spam so that you can better assist your customers.
Other Settings
Account Details
Using the little person icon in the middle bottom of the side menu, you can edit your main account details. Change your email address, and even your password here.
Social Profiles
Use this setting to add your social media profiles to your shop page.
Store SEO
These are extra settings to help your shop show nicely in search results. Set the SEO Title to show something about your shop in browser tabs. It will default to the name of your shop if left blank.
The meta description will show under the link for your shop in search results. If nothing is set here, it will default to words pulled from the shop page. Set a unique description, but keep it short so it shows in search results.
Managing Products
Adding Products
From your Dashboard, click "Products" in the side menu.
In the top right corner of this view, you can click "Add New Product". If you have a similar product already listed, you can hover that product in the list instead and click "Duplicate" to start the new product listing with many of the same settings.
Basic Product Details
You will first enter the basic details about the product like the title, images, price, categories, tags, and description.
Once these details are entered, click "Create Product".
Advanced Product Settings
When a basic product listing is created, you can then edit the advanced settings for that product. This includes shipping settings, variations, inventory, and warranties specific to that product.
Removing Products
To delete a product, simply hover the title of the product you wish to delete and click "Delete Permanently".
If you just want to disable a product but keep the listing in your dashboard, edit the product, scroll to the bottom of the settings page, and set the product visibility to "Hidden".
Simple Products
Simple products are the most basic listing. They have limited settings, no variations, and can be physical or downloadable.
Use this for items that are one of a kind or you do not make to order.
Variable Products
Variable products are products that have options the customer can choose before making a purchase.
Variations are based on Attributes, so Attributes must be selected before you can create the Variations.
Some basic Attributes are available for you to choose, but you can also add a Custom Attribute if you need something more specific.
With your attribute selected, add all of the variations for the product that you offer.
If you offer more than one option, add another attribute for each option. For example, you might sell t-shirts in multiple sizes and colors. The size will be one attribute, and the color will be a second. They will each have their own set of variations to choose from.
Digital Products
Digital products can be setup as Simple Products. Create listings for these products with the downloadable file(s) attached to the listing.
When a customer purchases these products, they will be sent a download link to receive the files.
Sales & Clearance
You will be able to create your own sales and clearance on your products. You can do this either by having store-wide sales, creating coupon codes, or setting product-specific discounts by setting a sale price.
Vendor Tips
Product Photography
Make sure your product photos are clear, bright, and highlight all the details of your listing.
- Take photos in bright, natural light. Don't use the flash on your camera or place your item in direct sunlight.
- Keep clutter out of your photos. Use a clean, plain surface to allow your product to stand out.
- Try to use models. Customers buying online will like to see your product in use by a real person!
Keywording Product Listings
Products with descriptive names show up in more searches! If you don't like to use long, descriptive titles, take the time to utilize keywords in your product descriptions.
Write interesting descriptions that capture your customers attention and make them want your product. It can be best to write as if you were talking to someone casually about your product rather than trying to describe it precisely.
Product Categories & Tags
Your product's main category will place it with similar types of items. Be sure to pick the category(s) that best fit your products.
Think: what section of a store would someone look for your product?
Use tags to further describe your product. Refine the category it belongs in by style, materials, trend, etc.
Product Descriptions
Descriptions should captivate your customers and give them reason to buy your product. What makes your piece special? What would you say about your product if you were excitedly telling someone about what you just made?
Write your descriptions as if you were talking about your products casually.
Pricing Your Work
You are worth more than you think.
Many makers make the mistake of underpricing their work. Make sure you pay yourself for your time, materials, and talent you've put into making your art.
Promoting Your Shop
Run social media accounts for your shop to help get your products in front of more people.
Instagram is a great place for promotion. You can also join Facebook groups that allow you to self promote and reach more customers.
Bonus: We promote our vendors regularly! Use all of these vendor tips to make your shop and products looks their best for a better chance to be featured by our main accounts!
The Vendor Community
We have an online community for vendors to talk, share, and lift each other up.
Join the vendor community on Facebook:
